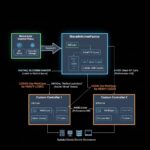
In modern Kubernetes environments, connecting external systems—like virtual machines, legacy appliances, or third-party load balancers—to pods often requires overlay tunneling. Cilium’s VTEP (VXLAN Tunnel Endpoint) integration makes this seamless by allowing direct VXLAN communication between Cilium-managed pods and external VTEP devices.
But how do you actually observe and debug the traffic flowing through these tunnels without introducing performance penalties? Traditional tools like tcpdump copy packets to user space, which can add significant overhead in high-throughput scenarios.
Enter eBPF (extended Berkeley Packet Filter). By running sandboxed programs directly in the Linux kernel, eBPF enables low-overhead packet inspection at early processing stages—such as XDP (eXpress Data Path)—making it ideal for observability in production.
This article walks through setting up Cilium VTEP integration on Azure Kubernetes Service (AKS), establishing a VXLAN tunnel from an external Ubuntu VM, and capturing TCP headers using a custom eBPF/XDP program. We’ll also touch on using Inspektor Gadget for quick tracing.
Why This Matters: The Challenge with Tunnel Traffic Observability
Cilium leverages eBPF as its core datapath for networking, security, and observability in Kubernetes. Its VTEP feature (introduced around Cilium 1.12 and matured in later releases) lets third-party VTEPs communicate with pods via VXLAN encapsulation over UDP port 8472.
Traffic inside these tunnels is encapsulated, so conventional capture tools on the physical interface see only outer VXLAN/UDP packets. Decapsulating and inspecting inner payloads efficiently requires kernel-level insight—exactly where eBPF shines.
Benefits of the eBPF approach:
- Zero-copy inspection — No packet duplication to user space unless you explicitly want it.
- Early interception — Attach at XDP for ingress processing before most kernel networking stack.
- Programmability — Parse headers, filter flows, or even drop/modify packets if needed.
- Production safety — Minimal performance impact compared to tcpdump -i any.
Prerequisites
- An AKS cluster running Cilium (version 1.17+ recommended) in BYOCNI (Bring Your Own CNI) mode.
- An external Ubuntu 24.04 LTS VM with network reachability to AKS nodes.
- Firewall rules allowing UDP/8472 (VXLAN) traffic.
- Tools: cilium CLI, kubectl, krew (for Inspektor Gadget), libbpf, and basic build tools (make, clang for eBPF).
Step 1: Enable VTEP in Cilium on AKS
Enable VTEP mode and configure the external endpoint:
Bash
cilium config set enable-vtep true
cilium config set vtep-endpoint 10.1.0.11          # Your VM's public/private IP
cilium config set vtep-cidr 192.168.101.0/24       # Tunnel subnet
cilium config set vtep-mask 255.255.255.0
cilium config set vtep-mac 60:45:bd:01:87:b2       # MAC for the VXLAN interface
Verify the VTEP mappings:
Bash
kubectl -n kube-system exec ds/cilium -- cilium-dbg bpf vtep list
This tells Cilium how to encapsulate/decapsulate traffic for your external VTEP.
Step 2: Set Up the VXLAN Interface on the External Ubuntu VM
Create a VXLAN interface matching Cilium’s configuration:
Bash
ip link add vxlan2 type vxlan id 2 dstport 8472 local 10.1.0.11 dev eth0
ip link set dev vxlan2 address 60:45:bd:01:87:b2
ip link set vxlan2 up
ip addr add 192.168.101.11/24 dev vxlan2

# Route to pod CIDR via the tunnel
ip route add 10.10.0.0/16 dev vxlan2 proto kernel scope link src 192.168.101.11
Populate the forwarding database (FDB) with AKS node IPs for multicast-like flooding:
Bash
bridge fdb append 00:00:00:00:00:00 dst 10.4.0.5 dev vxlan2
bridge fdb append 00:00:00:00:00:00 dst 10.4.0.6 dev vxlan2
# Add entries for all relevant AKS node IPs
Step 3: Verify Connectivity
Deploy a simple NGINX pod in AKS:
Bash
kubectl apply -f https://k8s.io/examples/application/deployment.yaml
From the VM, test:
Bash
curl http://10.10.2.100 # Replace with an actual pod IP or service
A 200 OK confirms the tunnel works.
Step 4: Quick Observability with Inspektor Gadget
Install the Gadget plugin:
Bash
kubectl krew install gadget
kubectl gadget deploy
Trace network events cluster-wide:
Bash
kubectl gadget trace network
Look for flows from your VM’s tunnel IP (192.168.101.11) to pod ports. This eBPF-powered tool gives instant visibility into connections without custom code.
Step 5: Custom eBPF/XDP Program for TCP Header Capture
For deeper inspection, use a custom XDP program to parse inner packets on the vxlan2 interface.
Clone the Eunomia BPF tutorial repo (great resource for learning eBPF):
Bash
git clone https://github.com/eunomia-bpf/bpf-developer-tutorial.git
cd bpf-developer-tutorial/src/41-xdp-tcpdump/
make
Load and attach the program:
Bash
sudo ./xdp-tcpdump vxlan2
Generate traffic from the VM (e.g., curl http://10.10.2.100), and watch the output:
text
Captured TCP Header:
  Source Port: 80
  Destination Port: 35504
  Sequence Number: 3675756418
  Acknowledgment Number: 3278439525
  Data Offset: 10
  Flags: 0x12 (SYN-ACK)
  Window Size: 64308
This program attaches at XDP on ingress, parses VXLAN + inner Ethernet/IP/TCP, and streams headers via a ring buffer (BPF_MAP_TYPE_RINGBUF) to user space—efficient and customizable.
Key Takeaways and Next Steps
- Cilium VTEP + eBPF enables seamless hybrid connectivity while keeping observability native and performant.
- Tools like Inspektor Gadget provide out-of-the-box tracing; custom XDP programs unlock granular control.
- Extend this: filter specific flows, count packets, detect anomalies, or integrate with Prometheus.
This pattern is especially valuable in environments blending Kubernetes with external hardware or multi-cloud setups. As eBPF adoption grows, expect even richer tooling around tunnel inspection.
For production hardening, test under load and ensure kernel compatibility (5.10+ recommended for robust XDP support).
Happy debugging—and stay tuned to Cilium and eBPF developments for even more powerful networking primitives!
Follow us for more Updates